Showing posts with label nature. Show all posts

Wednesday, October 22, 2014

Make A Suet Log For Better Photographs


While we’re on the subject of cheap, effective, easy to make feeder stands, I wanted to pass along one of my favorite perches for Woodpeckers (and loads of other birds). While the previous stand I blogged about was cheap (less than $20 - link on the right side of the page), this one is darned near free! Below is a wide-shot of the feeder:
 
As you can imagine, it doesn’t take a degree in feeder-building to construct this thing. EVERYTHING you need to build this is as follows:

      o  1 log about 3 feet long with a diameter of 4 or 5 inches
      o  1 scrap piece of 2x12 board maybe 2 feet long or a similar piece of plywood
      o  2 decent sized nails
      o  Hammer
      o  Hand Drill with 1/4 inch and 1 inch drill bits
      o  Suet or Peanut Butter

      o  2 Cans of Beer (optional - see following paragraph)

If you don’t have these larger drill bits – DON’T BUY THEM! Your next door neighbor has them, just borrow them and share the beer. The diameter of the holes you use isn’t terribly important. Larger or smaller is fine:

Not to insult your intelligence, but here’s what you do with the above pile of stuff. Nail the log to the board - go crazy and use both nails. I use a smallish log for this purpose because it's easier to move around the yard. Drill a 1/4 inch diameter about an inch deep in the top of the log. Cram it full of peanut butter or suet (that's the brown muck in the middle):
 
Drill a 1 inch diameter hole on the side of the log about an inch deep and about 6 inches from the top. Cram it full of peanut butter or suet too:


Place the setup near your regular feeders for a day or two so that the woodpeckers learn how to use it. Once they figure it out, they will check it out often for goodies.

I like to position the holes so that they are just out of sight of the camera. This also puts the birds at the perfect angle for photos. I place the feeder where the light is good and the background is nice. Below is a focused shot of the background I used for most of the shots below which makes a nice, colorful background when it’s out of focus:

When you put this device near other feeders, all sorts of birds that aren’t looking for peanut butter or suet will use the top for a perch going to or from someplace else. Here's some of the shots - Downy Woodpecker (the 1 inch hole is in front of the bird, just out of sight):


Hairy Woodpecker:
 
 
Red-bellied Woodpecker on the top hole:


White-breasted Nuthatch (the hole with peanut butter is near the tail):


Tufted Titmouse:


Bluebird using the top for other purposes (eating an insect):


Thanks for stopping by! You can see more of my work at:

and:

www.flickr.com/photos/steve_byland/
 
My email is sbbyland@aol.com


Sunday, July 22, 2012

Create Your Own Bird Sanctuary


If you love birds, you’ve probably visited a nature sanctuary near your home and marveled at the wildlife. The feeders at the visitor center are teeming with birds of all kinds. It may be only a 15 minute drive, but it might as well be an entire world away.

Apple trees are the perfect cover for birds year round. They have insects in spring and summer, apples through the fall, and thick masses of branches in the winter

So, what is the difference between YOUR back yard and THIS place? You have a feeder or two and get your share of Cardinals and Chickadees, especially in the winter. Still, your yard pales in comparison to the local nature center. They always seem to have something special.

Don’t you wish that your backyard was more like the nature center? It could be. You may not have 100 acres, a pond, open fields and wooded acres like they do, but there are things that you can learn from them to attract more birds into your own yard. I live less than 30 miles from New York City and sometimes feel like I’m directly in the flight path to the Newark Airport, but my yard is swarming with birds. While writing this article, I took a break to take care of the birds in my yard. It’s going to be over 100 degrees today, and they appreciate a little extra attention. I put out some dried meal worms for the Bluebirds and their newly fledged young. The Hummingbird feeders needed to be cleaned and refilled. The Catbirds and Woodpeckers have emptied the suet feeder again. I wiped the birdbaths clean and filled them with cool water. Some seed in the platform feeder, another handful sprinkled on the ground, a few peanuts for the Squirrels, and I was back inside in less than 10 minutes.  During that time, I encountered about 50 birds and close to 20 species. If I had stayed out an hour, I would have probably had closer to 35 species.

Even if birds that don’t come to your feeders may use butterfly bushes like this Common Yellowthroat. Hummingbirds and butterflies will visit in the summer for nectar and insects

Was my yard always like this? Certainly not. It took years to entice Bluebirds to nest here, but they are now fixtures in my neighborhood. The same is true for Hummingbirds. They can be difficult to attract to nest in my part of the country, but I have them visiting my feeders all summer long like clockwork – about every 10 minutes. How did I do it? More important, how can YOU do it too?

Think of creating a backyard bird sanctuary the same way you would think about planting a beautiful garden. Most new homeowners have had the experience of moving into a house, admiring the neighbor’s beautiful garden, then rushing to the garden center for a few flats of flowers. Once in the ground, most of the flowers died within a few weeks and we moaned “I just don’t have a green thumb.” It’s the same thing with birds. We bought a feeder and bag of seed at the hardware store and set it up. It either attracted nothing and the seed spoiled, or we got only Starlings and House Sparrows. “There just aren’t any good birds in my neighborhood,” we said. Why did the flowers die? Why no flock of pretty songbirds? The answer is pretty much the same. They didn’t get what they needed. Flowers need the right soil, the correct amount of light and the proper amount of water. Needs differ for each type of flower. Birds are no different.

Some feeders are designed to prevent “undesirable” birds such as Starlings like this suet feeder that can only be accessed from below 

Each species of bird has very specific needs. If you give them what they want, they will probably come to your yard. Okay, what do they need? 
  • Safety from predators
  • Food
  • Water
  • A place to nest and raise their young (assuming that they breed in your area)
ALL of these are important. Let’s look at each of them.

Safety From Predators – A bird’s eye view of the world is one filled with danger. Hawks above, cats and other predators below. The best shelters come from trees, bushes, brush piles and tall grass. Of course, predators use the same things for cover, so keep a little open space between sheltered areas so that the birds can use their keen eyesight to keep watch. Plan and manage the habitat – that’s what they do at the nature center.

 Hummingbird feeders need not be fancy. Red feeders with yellow flowers are recognized by most hummingbirds as a good source of food. This feeder is about the size of a roll of quarters and cost less than $5.00

Food – This is something that might take a little research. For optimum success, you need to know what birds are in your area at each time of year, what their favorite foods are, their preferred type of feeder, etc. You need to match the type of feeder and food to the species you want to attract. Cardinals, for instance, prefer platform feeders with black oil sunflower seeds. Hummingbirds want sugar water feeders. Woodpeckers, Catbirds and Titmice love suet. A visit to the local nature center can put you on the right track here. Don’t go crazy at first. Just get a few feeders with the appropriate food at first and work your way up slowly. Remember to place the feeders close to the safe places mentioned above. Make sure they are where you can see them as well so that you enjoy your new friends and remember to feed them. Keep the feeders clean, but you don’t need to fill them to the top until the birds are eating more. Having fresh food is important. Since the species of birds in your area changes with the seasons, so will the types of food you should offer.

 This birdbath is heated for year-round use and can accommodate the whole family

Water – Birds need water year-round. Birdbaths range from expensive heated affairs with cascading waterfalls to something homemade. Try turning over a large flower pot, placing the base on top and filling the base with water. The important thing is that the water be clean and available at all times. Not all birds come to feeders, but almost all come to water.

  Here is part of the same family bathing in a bath made from a large, broken flower pot and its base


Nesting – Some songbird species will nest in birdhouses and some will not. Bluebirds, Swallows, Chickadees and Wrens are among some of the more popular songbirds that use nest boxes. Each prefers a slightly different kind of box that will meet their needs while discouraging other species. You might want to buy birdhouses that target the species you want from a manufacturer such as Duncraft (www.duncraft.com) that has different birdhouses for different species. Other birds will probably nest in the sheltered areas listed earlier.

Birdhouses can be made from plans easily found on the internet and can be customized for different species. This box has a wide hole to let more than one baby Tree Swallow look out at a time.

If you are a photographer, like I am, think about lighting while you make your plans. I have a spot in my yard that gets fantastic light in the afternoon. Guess where I put the Bluebird house. Most of my feeders and birdhouses can be rotated to follow the sun provide different backgrounds. I do most of my photography from a blind that keeps me out of the sun and minimizes disturbance to the birds.

Smaller bird houses are perfect for smaller birds such as Wrens, Chickadees and Titmice

Like a beautiful garden, a backyard bird sanctuary grows and matures over time. Every year, you can make it a little better, a little safer and a little more attractive to you and the birds that will come to call your yard home.

Steve Byland is a wildlife photographer living in suburban New Jersey. His photos can be seen at www.stevebyland.com – many of which were taken in his own backyard. You can email him at sbbyland@aol.com

Friday, July 20, 2012

Ten Tips For Taking Bird Pictures Like A Pro In Your Own Backyard

Planning your photos in advance increases you odds of getting great photos. This male Bluebird often hovered over his mate during the mating season

I’ve been a professional wildlife photographer for years and travel all across the country to take pictures. It’s a great job, but somebody’s got to do it. I’ve crisscrossed the United States from north to south and east to west. Winter, spring, summer or fall, I’ve been there. Still, my favorite place to take photographs is my own backyard. I know it like the back of my hand. Hundreds, maybe even thousands of birds visit my bird feeders every year. I’ve spent so much time out there that I recognize a good number of them individually. Most of my best-selling shots are of birds that I’ve known for years.
Very few of my shots are random. When I walk out the back door, I usually have a plan for what I want to shoot that day. Certainly birds and animals are somewhat unpredictable, so I don’t know exactly what I’m going to get, but whatever is presented to me, I’m usually ready for it. Let me share with you the ten steps I use to get the shots I want.

Tip 1: Pick your subject

I select the camera/lens combination based on the species, or at least size of bird I want to photograph that day. I don’t use the same set-up for tiny Hummingbirds that I use for larger birds such as Blue Jays. I find that NOT concentrating on something specific leads to missed shots. The best way to get the once-in-a-lifetime photo is to be ready for it when the opportunity presents itself. 

Male Pine Warblers often visit my suet feeders in late March

Tip 2: Learn Behavior

If you know a bird’s behavior, you increase your chances of getting great shots. You don’t have to do a lot of studying – just observe the birds in your yard. How often do they come to the feeder? How long do they stay? What do they eat? How do they interact with other birds? I often find that individual Hummingbirds will come to a feeder on a set schedule that varies by less than a minute during the day. They often feed exactly the same each time they visit. Knowing this is all the advantage I need.

Tip 3: Anticipate Behavior

My reflexes are slow compared to those of birds. By the time I see the scene I want and communicate to my finger to press the shutter button, it’s usually too late. Often, though, there is something that will signal you that good things are about to happen. Baby Tree Swallows looking out of a birdhouse start squawking a few seconds before the parents show up with a meal which allows me to start shooting before they get to the nest.

The baby Tree Swallow would announce the anticipated arrival of the parent with food

Tip 4: Plan For Good Light

Study the light in your yard. Light is best in early morning and late afternoon, but often shadows from trees block the light. Look for places in your yard where the light is still present at these times. Pictures taken at high noon on sunny days will be harsh. If you can only shoot at mid-day because of trees, choose days that are overcast, but bright.  

Birds often get into habits like this Bluebird that likes to bathe in the afternoon

Tip 5: Watch Your Background

There’s an old saying that if something doesn’t add to the picture then it takes away from it. You don’t want the subject of you picture to get lost in the clutter. It should be prominent enough to make a statement.

Tip 6: Control Depth Of Field

Using a wide aperture gives a shallow depth of field (DOF) and allows for faster shutter speed. A shallow DOF blurs the background and allows you subject to stand out. Most lenses are sharpest about one stop smaller than the widest aperture.

Out of focus flowers and a shallow depth of field make this Hummingbird stand out against the background

Tip 7: Compose Your Shot

Before you start shooting, consider what you want the shot to look like. Do you want a tight head shot, or a wide shot of birds playing in a birdbath? Knowing this will help you decide where to set up and what length lens to use.

Tip 8: Focus on the Head

Another old saying is that nobody gives a rat’s ass about the ass. You can cut off any part of the body in a shot except the head. Focus on the head (especially the eyes). Try to get the bird looking at you or almost perpendicular to you with the beak ever so slightly towards you. You don’t want to get the shot from behind or with the bird looking away.

The use of a blind can allow you get close – especially if you let the bird come to you

Tip 9: Use a Tripod

Nobody really LIKES to use a tripod. They are heavy and limit your ability to move. They offer tremendous advantages, however. First, shots taken from a tripod will be significantly sharper. Also, if your camera is on a tripod, it will be ready to shoot and there will be less movement from getting the camera in position. The less you move the camera, the more likely the bird will remain where you want it.

Tip 10: Use a Blind

A blind doesn’t have to be fancy. There are commercial pop-up blinds available for less than $50, but even a simple sheet draped over a ladder or a fence will do the trick. You will get your best shots when the bird comes to you rather than the other way around. They will be far more comfortable if they feel in control. Also, some sort of covering will help keep you out of the sun. I have a large home-made blind on wheels that I keep out in my yard. The birds are so used to it that they often perch on it while I’m in it. I even have birds land on the lens of my camera and peek in at me.

This shot combines everything. This male Cardinal has a favorite perch near a sunflower seed feeder. I used the blue sky as a background. He came close because I was in a blind. His head is at the right angle. I focused on the eye. I caught a shot showing some behavior.

A Final Word

The most important thing that I have found about wildlife photography is to enjoy the time that I spend doing it. Learn to appreciate the wonderful things you see whether you get photos or not. If you follow my advice, by design there will be certain shots that you will miss because you just aren’t set up for them (too much or not enough lens, for instance). Think of those instances not as missed opportunities, but as scouting missions for the next photo session. Perhaps you will come to find that the family of Bluebirds comes to the birdbath every afternoon to cool off or there is a Grosbeak you didn’t know lived in your neighborhood that likes the safflower seeds in the feeder.

You may never know exactly what you are going to get, but with a little planning and observation, you might just get that once-in-a-lifetime shot in your own backyard. I get them all the time.

Steve Byland is a wildlife photographer living in suburban New Jersey. His photos can be seen at www.stevebyland.com – many of which were taken in his own backyard.

Monday, July 9, 2012

Attract More Vultures To Your Yard


Say What????

Pair of Black Vultures
Okay, so Vultures aren’t up there with Cardinals and Goldfinches when it comes to what most people think of as “desirable” yard birds, but I still like them. Besides, I’d rather have Vultures than Starlings. Vultures never moved into a Bluebird nest and they haven’t taken up residence in my garage (thank goodness). In fact, aside from their peculiar habit of eating the windshield wipers on tourists’ cars in the Everglades, I’ve never heard of Vultures doing anything bad. Besides, the windshield wiper thing is pretty funny to watch, as long as it’s not your car they’re eating.

Turkey Vulture
Vultures are nature’s garbage collectors (or, maybe they prefer “sanitation engineers”). Since the towns in my area stopped picking up roadkilled animals due to cutbacks, the Vultures have stepped up to the plate (so to speak) and have taken on the task of keeping our cities clean. On top of that, they don’t demand pensions and never take a day off. In my part of the country, we have two species of Vultures – Turkey and Black. They aren’t that closely related, but they look fairly similar.

Turkey Vultures have silver and black under wings and a longer tail

While Turkey Vultures fly effortlessly, often going for hours without beating their wings, the heavier Black Vultures have trouble getting off the ground and seem to beat their wings franticly to get airborne. Turkey Vultures are one of the few birds with a well-developed sense of smell and are frequently first on the scene. Black Vultures are the more aggressive of the two, flying high in hopes of spotting Turkey Vultures feeding and then moving in and pushing them aside, but enough of the ornithology lesson.

Black Vultures have white patches at the wingtips and a shorter tail

I began feeding Vultures about ten years ago when I came across a dead deer in my backyard. I thought about dragging the thing into the woods, but then decided to move it into the yard a bit. I put it behind a tree so that it couldn’t be seen from the kitchen window. At least I have SOME common sense. My wife soon noticed about a dozen large black birds in the trees with more circling overhead and asked me what was going on. I confessed to dragging the carcass under the tree out of sight. She was upset and demanded that I move the body into the middle of the yard where she could watch the activity. I KNEW there was a reason I married her. In just a few days, the huge mess was reduced to a small pile of fur and bones that easily fit into a trash bag.
I have lots of gruesome shots, but there is a chance that you might be eating

A couple of months later, I drove past another carcass on the side of the road near my house. I looped a short rope around a leg, tied it off to the bumper of my truck and dragged it home. As I bounced off the street and onto my lawn, I saw my neighbor standing by his mailbox with a look on his face that could best be described as “horrified.” Oops – Busted! He followed me into the backyard to find out what on earth I was doing. I fessed up to my social faux pas. The next day, he came over to see the activity around my new “feeder” and told me to call him if another such feeder became available so that he could have one too. Now, THAT’S a good neighbor.
The heads of ADULT Turkey Vultures turn red

Over the years, I have put out a variety of things for the Vultures to eat. They aren’t very picky. In fact, the worse the offering is, the better they seem to like it. They make very short work of such things as the remains of the Thanksgiving Turkey or a package of roast beef that went bad in the back of the refrigerator. I presented my boldest offering two years ago when I pulled a frozen turkey out of the freezer that had been there for three years. There was no way that I was going to eat it. It was the middle of winter and the snow was deep so I took plastic wrap off the bird and carried it out into the yard. I worried that a coyote or fox might drag the still-frozen thing away, so I drove a long piece of rebar through it to hold it down. Did I mention that the location I choose was right outside my bathroom window and visible from the street? I wanted to get pictures and didn’t feel like standing outside in the cold. It would be much more comfortable, I figured, to set up a tripod in my bathroom and shoot through the open window.

The heads of Black Vultures are always dark

The next day, there were Vultures flying low over the yard and perched on the roof of every house in the neighborhood. More were on my roof, of course, than anywhere else. This time, my neighbor called me to ask what was going on (too cold out to stand by the mailbox). I confessed to what I had done and, again, I could hear the jealousy in his voice. Actually, he was dead silent, but I knew that he was green with envy. As it turns out, a rock-hard turkey that has been frozen solid for years takes the better part of a week to finish off. It makes me wonder why they aren’t sold in the upscale bird feed stores that are down on the highway.

This is as bad as I’m going to show – raw turkey at its finest

If you decide to follow my example, make sure your keep your expectations realistic at first. It may take a couple of weeks for the Vultures to get interested in your offerings. You can put something out at any time of year, but the summer heat seems to help the process along. Keep in mind that Vultures are wary, so it’s probably best not to put a carcass too near the house (like on the patio or next to the pool), until they get comfortable with your yard. Also, offer a variety of food – nobody likes to eat the same thing every day. Above all, take the time to smell the roses, so to speak. Enjoy your new bird friends and send me a photo of your successes.

Steve Byland is a wildlife photographer living in suburban New Jersey. His photos can be seen at www.stevebyland.com – many of which were taken in his own backyard. He can be reached by email at sbbyland@aol.com.

Thursday, May 3, 2012

The Man Cave

View of the front - note the wheels
and the foot rest under the cameras

A lot of people who know me have heard about “The Man Cave,” which is my own, custom-build blind that I use for photography in my backyard. If you don’t know me (and I can’t imagine WHY you would be reading this if you don’t, but we’ll ignore your lack of judgment – for now) I am a professional wildlife photographer. I have used a variety of blinds for a number of years – mostly those pop-up camo blinds, in order to allow my subjects to get closer to me and to keep me out of the elements – more or less. They are a great tool, but they wear out, blow over in strong winds and you have to take them in and out every day. They can also get a little cramped inside with tripods, chairs, coolers and such.
A little plastic on top helps keep out the rain

About two years ago, I decided that I wanted something a bit more permanent. I knew the basic elements that I wanted – weather resistant, solid and movable. I even knew the size (4’ x 5’ x 6’ – W x L x H). Now, all I had to do was build it.

Run-flat wheels were a later addition
I got a flat early on - AAA does not service photo blinds

Sunday, May 22, 2011

Taking Wildlife Photos In The Rain

Black-chinned Hummingbird during an Arizona Monsoon
400mm, ISO 400, f/5.6, 1/40 second

Many photographers will tell you that there is never enough light. Maybe it would be better to say that there is never enough PERFECT light. To me, with the exception of a poorly cooked hamburger, nothing is more disappointing that having a photo that is both underexposed and overexposed at the same time. For example, an adult Bald Eagle flies by, banks perfectly and still, the body feathers are too dark and the white head too light so that you lose detail on both ends.

This is an example of a photo that came out poorly
because of too much light on a bright sunny day

This is usually not a problem during the “golden hours” which are thought to be an hour after sunrise and an hour before sunset. The golden hours are also known as the “magic hours” or, as I like to call them, about two hours before I haul my butt out of bed and an hour after my feet hurt so badly that I can hardly walk anymore.

Eastern Bluebird - if you look closely, you can see rain on his back
600mm, ISO 500, f/7.1, 1/320 second

Saturday, May 21, 2011

End Of The World Photos

Man Cave

You might not know it if you just watch the regular news, but the world is supposed to end today – sometime this evening. You would THINK that this might make the news, but apparently not. Now, as some of you know, I built a “man cave” a few weeks ago as a heavy-duty blind from which to take photos. I don’t mean to imply that this will protect you in the case of the world’s end, it just fits into the events of today.


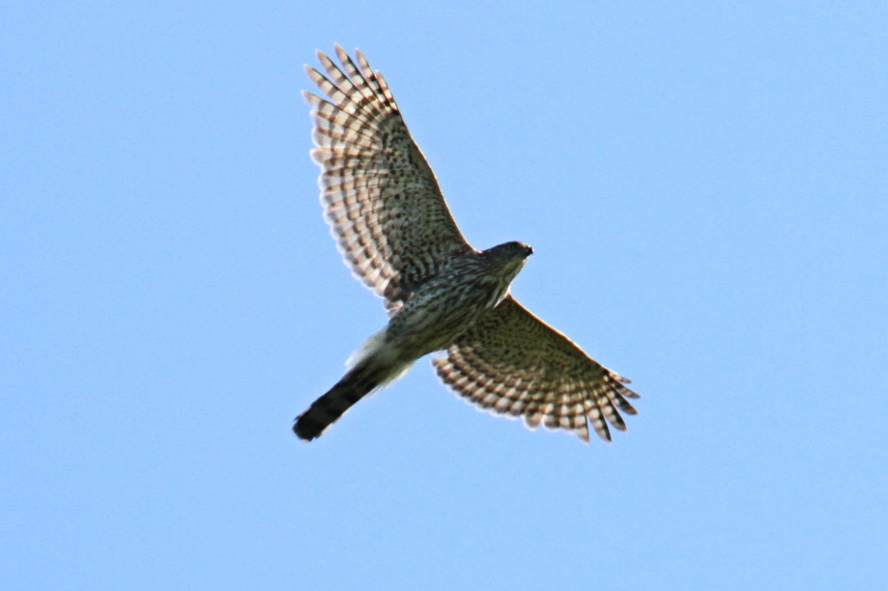
Juvie Cooper's Hawks Terrorizing the neighborhood today
Note: Raptor vs Rapture - very important difference

Side note – APPARENTLY the world isn’t actually supposed to come to and end, per se. Instead, all the good people will go up to heaven and leave the rest behind. Again, very skimpy reporting. After what I believe was the deadline, I began calling those people that I figured might be among those going to heaven. No answers from any of them. I guess that means that I might have missed the cut. If that’s the case, I am going to stop recycling.


Hummer made a showing today

Monday, May 2, 2011

House Wren Nest Building

Lots of birds building nests in the yard this week. Eastern Bluebirds have 4 eggs, while the Tree Swallows and House Wrens are working hard on their nests. While generally efficient nest-builders, one particular House Wren seems to have a bit of a problem with measurements.

Step One - Select stick of correct size:

 
Step Two - Check your measurements:


Step Three - Slam that baby home!

Thwang!!! (Ouch)

Step Four: Celebrate your successes:


Lots of recent Bluebird Pic can be seen here: http://www.flickr.com/photos/steve_byland/

You can see thousands of my photos at http://www.stevebyland.com/. They are all available for sale as prints or license.

Monday, April 25, 2011

Use Perches For Better Photos - Part I


Male Bluebird
Canon 7d - 300mm f/4.5 1/400th Second ISO 500
   
I’m known for a couple of things; a twisted sense of humor, the occasional good photo, and the creative use of stumps as perches for my shots. I don’t really much care for shots of birds on feeders, so I try to put something more attractive close by for them to pose on for me.

Placement of tripod with Branch - Canon Powershot
 
It may take a bit of getting used to, but you start to get a feel for what birds will land on and where best to place them. I often strap a log or branch to an old tripod so that I have more flexibility with the final positioning. Play around a bit until you get the light the way you want it.

Close-up of tripod - Canon Powershot