Photo Feeder Stand
For Better Photographs
It’s been far too long since my last blog. Hopefully this
latest effort will give you something that you will find useful. I’ve gotten a
lot of favorable comments on my Flickr Photos recently along with questions
about how I manage to get them. Below, I’ll tell you how to make a copy of one
of my favorite photo accessories – an inexpensive and very useful stand that I
use to get some of the best photos. The total cost of this stand should be
comfortably under $20 and should take less than an hour to make. I recently
built one in about 15 minutes (not counting the trip to Home Depot to buy the
supplies and a stop at McDonald’s for lunch).
Let’s start with a few photos of the stand that I will
describe:
This is made from 3/4 inch PVC pipe that comes in 10 foot
lengths at most home-improvement stores like Home Depot. The stand sits on a rectangular
base that is 2 feet wide and 3 feet deep. It is very stable and weighs just a
few pounds at most. The upright portion is 4 feet high with a lower crossbar 1
foot off the ground. Just above the lower crossbar, you will see a T Joint on
each side. These are 1 inch joints that hold various perches and can be moved
up and down as I will describe later.
The only tools that you will need are a small saw (hack-saw
or jig saw) to cut the pipe and a power drill. The pipe cuts very easily and
goes together easily. You could glue the joints, but I would recommend against
it. The pieces fit together snugly and you might want to take the unit apart
for storage or to make minor adjustments in the future. The list of parts is as
follows:
o 3 - 10 foot lengths of 3/4 inch PVC pipe
(standard weight, not heavy duty)
o 6 – 3/4 inch PVC 90 degree elbows
o 6 – 3/4 inch PVC “T” Joints
o 2 –1 inch PVC “T” Joints
o 2 nails or screws about 2 inches long
Cut the 10 foot lengths as follows:
o 2 – 3 foot lengths
o 3 – 2 foot lengths
o 4 – 1.5 foot lengths
o 2 – 1 foot lengths
o 2 – 11.5 inch lengths
o 1 - 8
inch length
Assemble the base using 2 of the 2 foot lengths, the 4 1.5
foot lengths, 4 of the elbows and 2 of the 3/4 inch “T” joiners. Turn the “T’s”
so that they point up when the base is on the ground. Put 1 foot lengths into
each “T” joined with another “T” and a 3 foot length. Slide one of the 1 inch “T”
pieces over each 3 foot pipe. Use 90 degree elbows and the last 2 foot length
to complete the top. Use the remaining 5 pieces to form the bottom cross-member
by connecting the two 11.5 inch sections with a “T” and placing the 8 inch
section into the “T” and capping it with the last “T” piece.
Drill a series of holes in the two 3 foot lengths of pipe as
shown in the photo below using a drill bit just a little larger than the nails.
Drill corresponding holes through the top side of the 1 inch “T” pieces. This
allows you to position the larger “T” pieces at various heights with a two foot
branch for the birds to land on, as you will see in the later photos. Use the nails or screws to hold the 1 inch "T's" in place:
Now, you’re almost ready to go! The bottom cross piece with
the 8 inch section coming off it is perfect for balancing a platform feeder of
some sort to hold seed for the birds. I like to use the white top of an old
bird bath which not only holds seed, it also reflect light up to the birds on
the perch to fill in shadows and provides wonderful light!
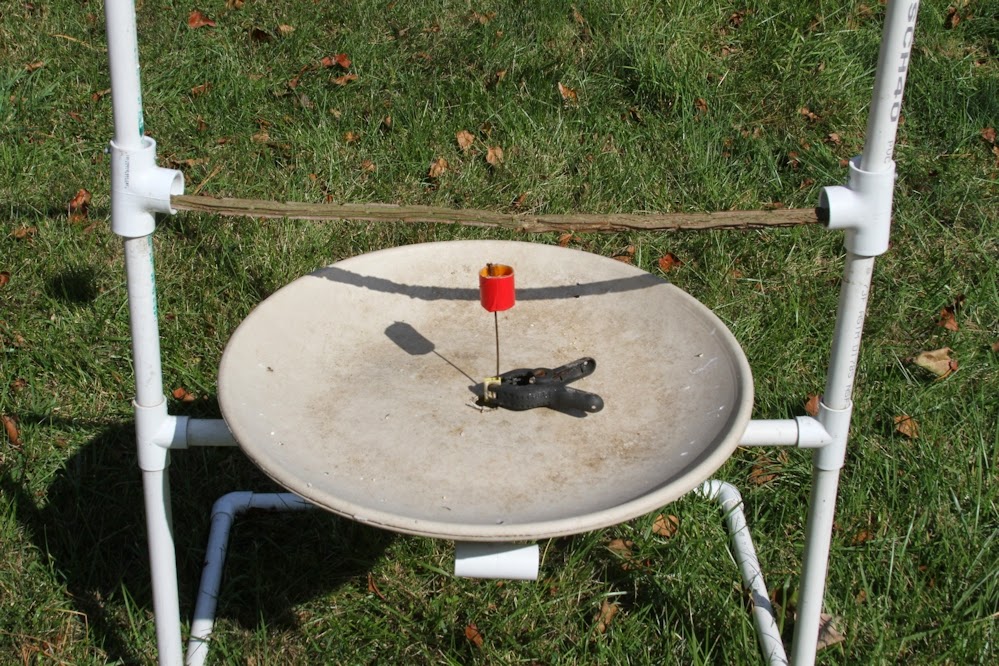
I further modified my platform by drilling a hole in the
birdbath top which allows for a small cup to hold extra treats like mealworms
for Bluebirds. I made this holder by cutting a 1 inch section off the bottom of
a pill bottle and taping it to a 1 foot length of a coat hanger wire. I keep it
at the right height using a clamp.
I change the height of the branch based on two factors.
I want to photograph the birds at something close to (or slightly below) eye-level
and I want a nice background. I use a blind for most of my shots where I sit in a chair, so I generally place the perches between two and
three feet high. I set up my blind with the sun at my back and place the stand
in front of me. I move it closer for small birds like Hummingbirds or
Chickadees and a little further away for larger birds, depending on their size.
So, let’s take a look at some of the shots. The first photo
is of a Bluebird feeding a baby. The cup with the mealworms is just below the
frame, The background is green(ish) lawn:
The next shot is another Bluebird, but this time I placed a
basket of flowers on a stand about 10 feet behind the perch for a nice effect:
For the Cardinal shot, I moved the perch to one of the
higher settings to use a tree that was turning yellow in the fall for the background. The Cardinals often stop on the perch before dropping to the feeder:
For the next shot, I placed the perch at a height that used
some of the tall brown grass that you can see in the first photo of the stand
as a background:
A Nuthatch just above the feedeer using another basket of flowers for a background:
For this Hummingbird shot, I attached a feeder to the branch
which I raised to eye-level. I tied the feeder down securely so that I wouldn’t
turn or move and placed another pot of flowers in the background. Again, I put the
empty bird bath below to provide fill light to the bird:
For this final shot, I hung a peanut butter-stuffed pinecone
from a hook on the top crosspiece and used a pine tree as the background:
Thanks for stopping by! You can see more of my work at:
and:
www.flickr.com/photos/steve_byland/