Showing posts with label photography. Show all posts

Wednesday, October 22, 2014

Make A Suet Log For Better Photographs


While we’re on the subject of cheap, effective, easy to make feeder stands, I wanted to pass along one of my favorite perches for Woodpeckers (and loads of other birds). While the previous stand I blogged about was cheap (less than $20 - link on the right side of the page), this one is darned near free! Below is a wide-shot of the feeder:
 
As you can imagine, it doesn’t take a degree in feeder-building to construct this thing. EVERYTHING you need to build this is as follows:

      o  1 log about 3 feet long with a diameter of 4 or 5 inches
      o  1 scrap piece of 2x12 board maybe 2 feet long or a similar piece of plywood
      o  2 decent sized nails
      o  Hammer
      o  Hand Drill with 1/4 inch and 1 inch drill bits
      o  Suet or Peanut Butter

      o  2 Cans of Beer (optional - see following paragraph)

If you don’t have these larger drill bits – DON’T BUY THEM! Your next door neighbor has them, just borrow them and share the beer. The diameter of the holes you use isn’t terribly important. Larger or smaller is fine:

Not to insult your intelligence, but here’s what you do with the above pile of stuff. Nail the log to the board - go crazy and use both nails. I use a smallish log for this purpose because it's easier to move around the yard. Drill a 1/4 inch diameter about an inch deep in the top of the log. Cram it full of peanut butter or suet (that's the brown muck in the middle):
 
Drill a 1 inch diameter hole on the side of the log about an inch deep and about 6 inches from the top. Cram it full of peanut butter or suet too:


Place the setup near your regular feeders for a day or two so that the woodpeckers learn how to use it. Once they figure it out, they will check it out often for goodies.

I like to position the holes so that they are just out of sight of the camera. This also puts the birds at the perfect angle for photos. I place the feeder where the light is good and the background is nice. Below is a focused shot of the background I used for most of the shots below which makes a nice, colorful background when it’s out of focus:

When you put this device near other feeders, all sorts of birds that aren’t looking for peanut butter or suet will use the top for a perch going to or from someplace else. Here's some of the shots - Downy Woodpecker (the 1 inch hole is in front of the bird, just out of sight):


Hairy Woodpecker:
 
 
Red-bellied Woodpecker on the top hole:


White-breasted Nuthatch (the hole with peanut butter is near the tail):


Tufted Titmouse:


Bluebird using the top for other purposes (eating an insect):


Thanks for stopping by! You can see more of my work at:

and:

www.flickr.com/photos/steve_byland/
 
My email is sbbyland@aol.com


Photo Feeder Stand For Better Photography


Photo Feeder Stand For Better Photographs


It’s been far too long since my last blog. Hopefully this latest effort will give you something that you will find useful. I’ve gotten a lot of favorable comments on my Flickr Photos recently along with questions about how I manage to get them. Below, I’ll tell you how to make a copy of one of my favorite photo accessories – an inexpensive and very useful stand that I use to get some of the best photos. The total cost of this stand should be comfortably under $20 and should take less than an hour to make. I recently built one in about 15 minutes (not counting the trip to Home Depot to buy the supplies and a stop at McDonald’s for lunch).

Let’s start with a few photos of the stand that I will describe:


This is made from 3/4 inch PVC pipe that comes in 10 foot lengths at most home-improvement stores like Home Depot. The stand sits on a rectangular base that is 2 feet wide and 3 feet deep. It is very stable and weighs just a few pounds at most. The upright portion is 4 feet high with a lower crossbar 1 foot off the ground. Just above the lower crossbar, you will see a T Joint on each side. These are 1 inch joints that hold various perches and can be moved up and down as I will describe later.

The only tools that you will need are a small saw (hack-saw or jig saw) to cut the pipe and a power drill. The pipe cuts very easily and goes together easily. You could glue the joints, but I would recommend against it. The pieces fit together snugly and you might want to take the unit apart for storage or to make minor adjustments in the future. The list of parts is as follows:
       o  3 - 10 foot lengths of 3/4 inch PVC pipe (standard weight, not heavy duty)
       o  6 – 3/4 inch PVC 90 degree elbows
       o  6 – 3/4 inch PVC “T” Joints
       o  2 –1 inch PVC “T” Joints
       o  2 nails or screws about 2 inches long

Cut the 10 foot lengths as follows:
       o  2 – 3 foot lengths
       o  3 – 2 foot lengths
       o  4 – 1.5 foot lengths
       o  2 – 1 foot lengths
       o  2 – 11.5 inch lengths
       o  1  - 8 inch length

Assemble the base using 2 of the 2 foot lengths, the 4 1.5 foot lengths, 4 of the elbows and 2 of the 3/4 inch “T” joiners. Turn the “T’s” so that they point up when the base is on the ground. Put 1 foot lengths into each “T” joined with another “T” and a 3 foot length. Slide one of the 1 inch “T” pieces over each 3 foot pipe. Use 90 degree elbows and the last 2 foot length to complete the top. Use the remaining 5 pieces to form the bottom cross-member by connecting the two 11.5 inch sections with a “T” and placing the 8 inch section into the “T” and capping it with the last “T” piece.

Drill a series of holes in the two 3 foot lengths of pipe as shown in the photo below using a drill bit just a little larger than the nails. Drill corresponding holes through the top side of the 1 inch “T” pieces. This allows you to position the larger “T” pieces at various heights with a two foot branch for the birds to land on, as you will see in the later photos. Use the nails or screws to hold the 1 inch "T's" in place:


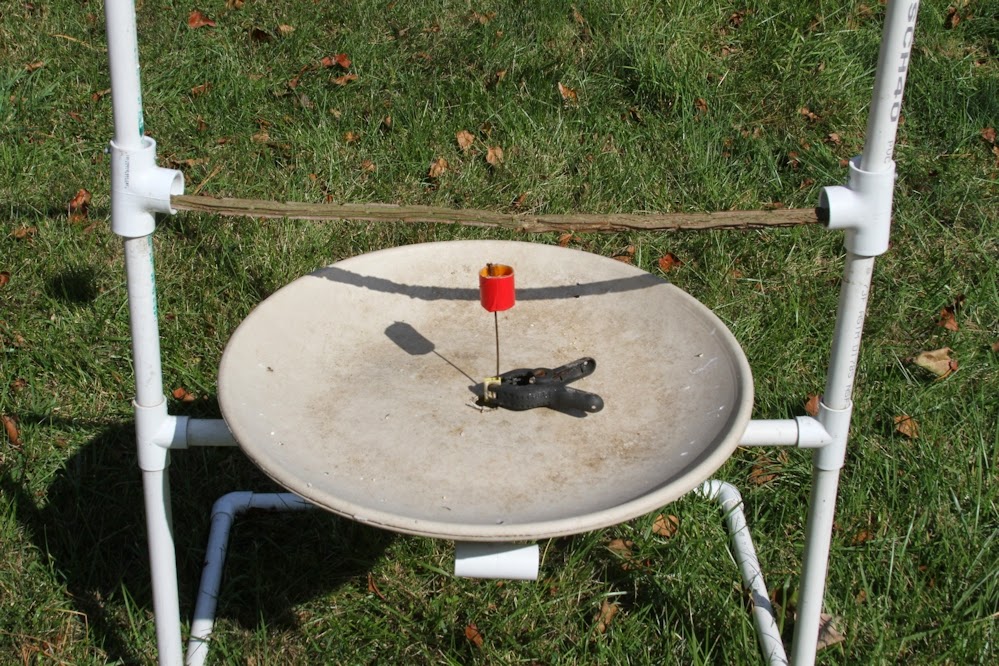
Now, you’re almost ready to go! The bottom cross piece with the 8 inch section coming off it is perfect for balancing a platform feeder of some sort to hold seed for the birds. I like to use the white top of an old bird bath which not only holds seed, it also reflect light up to the birds on the perch to fill in shadows and provides wonderful light!
 

I further modified my platform by drilling a hole in the birdbath top which allows for a small cup to hold extra treats like mealworms for Bluebirds. I made this holder by cutting a 1 inch section off the bottom of a pill bottle and taping it to a 1 foot length of a coat hanger wire. I keep it at the right height using a clamp.
 

I change the height of the branch based on two factors. I want to photograph the birds at something close to (or slightly below) eye-level and I want a nice background. I use a blind for most of my shots where I sit in a chair, so I generally place the perches between two and three feet high. I set up my blind with the sun at my back and place the stand in front of me. I move it closer for small birds like Hummingbirds or Chickadees and a little further away for larger birds, depending on their size.
 

So, let’s take a look at some of the shots. The first photo is of a Bluebird feeding a baby. The cup with the mealworms is just below the frame, The background is green(ish) lawn:
 

The next shot is another Bluebird, but this time I placed a basket of flowers on a stand about 10 feet behind the perch for a nice effect:
 

For the Cardinal shot, I moved the perch to one of the higher settings to use a tree that was turning yellow in the fall for the background. The Cardinals often stop on the perch before dropping to the feeder:
 

For the next shot, I placed the perch at a height that used some of the tall brown grass that you can see in the first photo of the stand as a background:
 

A Nuthatch just above the feedeer using another basket of flowers for a background:
 

For this Hummingbird shot, I attached a feeder to the branch which I raised to eye-level. I tied the feeder down securely so that I wouldn’t turn or move and placed another pot of flowers in the background. Again, I put the empty bird bath below to provide fill light to the bird:
 

For this final shot, I hung a peanut butter-stuffed pinecone from a hook on the top crosspiece and used a pine tree as the background:
 

Thanks for stopping by! You can see more of my work at:

and:

www.flickr.com/photos/steve_byland/

Sunday, October 7, 2012

Salvage A (Nearly) Great Shot Using Layers


Eventually it’s going to happen. You find yourself faced with the “perfect” shot and you reach down deep and blow it. The moment passes and you don’t get a second chance. Such was the case when I took the shot below. The subject was perfect, the light was just right and I managed to get the shot crooked. To be honest, I was lying on my back in a wet parking lot and I took this shot from underneath my truck. I was lucky to get anything at all, so a crooked shot was OK considering the circumstances. Here's my original shot:

 
I was so close and the owl in the picture filled the frame so well that simply straightening the picture in Photoshop was going to cut too much out. One option was to add a lot of canvas to the shot, clone in a bunch of stuff on the sides, then use the Straighten Tool. The problem is that this leaves a lot of evidence behind and takes a lot of work. There is another way to approach this problem using layers. I’ve choses a photo that is very busy (providing a lot of opportunities for mistakes). Shots with less going on are FAR easier, but even this shot is not that difficult. THIS is what happens when you use the "Straighten Tool" to try to fix the shot - my little owl is moving out of the frame:
 
 
So, we need to fix this photo using layers instead of the "Straighten Tool."

Step One – Create a new layer and drag the top layer so that the subject (the Owl) is positioned in approximately the right place – you can adjust this a bit later if necessary. If you look closely, you can see parts of the bottom (original) layer on the left and bottom edges of the photo.
 
Step Two – Rotate (straighten) just the top layer to get the subject where you want it. If necessary, you can move the top layer to reposition the subject. Using “Free Rotate” saves more canvas than “Straighten” and gives a little more flexibility, but either tool will work.

Now the subject is straight, but there are obvious lines around the edge of the top layer from rotating/straightening the photo. I have hidden the bottom layer so that you can clearly see this in the photo below.
 

Step Three –  What you want to do now is to blend the top (crooked) layer into the original layer below. With both layers showing, apply a mask to the top layer, choosing a mask that makes the top layer visible. Use a black paint brush on the mask to hide the edges of the top layer to blend the top layer into the layer below.
 
You can spend a lot of time blending with a small brush to make the photo perfect – I spent about 1 minute on this shot. The main evidence of my handiwork is a duplicate of the large blade of grass to the left of the owl, so I went back and cloned it out. All done and ready to move on to the next masterpiece.
 

Steve Byland is a wildlife photographer living in suburban New Jersey. His photos can be seen at www.stevebyland.com . You can email him at sbbyland@aol.com

Tuesday, July 31, 2012

Advanced Layering Techniques – Bring Back The Sky


If you shoot birds in flight, you’ve probably been frustrated by trying to get the exposure right. Either the bird is blown out, or, more often, the background sky looks perfect, but the bird is just a dark silhouette. Been there, done that, hit the “delete” button.  If you expose the bird perfectly (yay!) the sky is probably too light (boo!).

There are a number of ways to fix such shots. Making major adjustments usually cause some problems. Noise and artifacts appear whenever you lighten a photo, so starting with a photo where the sky looks good, but the bird is too dark probably won’t win you any awards. Let’s work on how to fix the best of the miserable shots you ended up with – the ones where the bird is exposed the way you want it but the sky is too light. Since the bird is the main subject, that’s the part of the picture that you will want to look best anyway.

The simple way to fix you photo is to make a separate layer, adjust the sky, then mask the bird. That’s fine if you aren’t going to print the shot or try to sell it, but it is VERY difficult and time-consuming to get the mask just right. There are places that you just can’t get right (teeny-tiny feather edges) and such. If you use the “Select” tool, there are often parts of the birds that aren’t selected properly, and if you zoom way in, there will be little jagged edges along the lines where one set of pixels were selected while others weren’t. Nothing is more disappointing that working forever on a single photo and, when you are done, it looks so bad that you just delete it.


While nothing beats getting the perfect shot in the first place, there is a way to fix these kinds of shots fairly quickly without showing a lot of boo-boos if you zoom way in or print the photo at a larger size. Yes, you can take a lot of time to go around and clean these things up, but it is time-consuming, and doesn’t always leave a great end product.

This technique will leave you with nicer edges

Let me also take a second to mention that I have to downsize these shots a lot to use on my blog page – there is WAY more detail in the full-sized shots. I’m also making the assumption here that you have a basic understanding of how to use layers and masks. If you DON’T know how to use these, LEARN!!!!! It will improve your processing a million percent and cut the time it takes by about the same amount. Photoshop and Corel Paint Shop Pro pretty much work the same way in the steps I’m going to explain.

Let’s look at a fairly quick and easy way to fix the shot below that is lacking sky detail:


First step, run a noise-reduction step – we’re going to darken the photo and that always adds a little noise. Second, remove the bird (WHAT???) using a large clone tool and save the file using a different name.


Next, make a duplicate layer and set the layer type to “Multiply.” Duplicate the multiplied layer a couple of times until you like the way the sky looks. In this case, I used three layers. Merge all the layers down. Now the sky looks better, but it seems to be missing a bird.


Next, go back to your ORIGINAL photo, copy the entire thing and post as a new layer. If you want to reposition the bird, you can select an area around the bird (instead of copying the entire photo) making sure to get a little of the background all around it and place it where you want. Make a duplicate copy of the layer you just copied in and click the “Visibility” button to make the top layer invisible. You now have 3 layers. The bottom layer is the adjusted sky without the bird, the second (middle) layer is the original photo, and the top layer is the original photo, but not visible. At this point, your photo will appear to look just like the original photo since it is on top of the adjusted sky photo. Now, set the middle layer type to “Darken.” This will put back most of your bird as shown below:


The problem is that the white/light areas of the bird will appear blue as they are not darker than the background. The nice thing is that the computer did all the hard work of putting in all the really fine details on the darker edges of the bird without leaving any harsh transitions.


Next, make the top layer visible again and select a mask that masks the entire photo. Using a white brush, carefully unmask the white/light areas of the bird. You may want to brush across the entire body of the bird to bring up white/light areas there as well. The only place you really have to be a little careful is where the white on the bird reaches the very edge of the body. Still, it is not very difficult to get nice results without much effort – now you only have to work on a few areas with the mask because the computer did the rest.

Before and after:


To see more detail, you can view a large version of the above photo at:

Here’s the finished product:


Is it cheating? I'll let you make your own decision. Either way, this is the way it looked through my viewfinder when I took the photo and now I have a nice photo. Essentially, this isn't much different than just selecting the sky only and darkening it. The real difference is that this method only impacts the sky behind the bird and leaves the bird exactly as it was - which is the whole point of what you otherwise would have been trying to achieve by just selecting and working on the sky. The difference is that this method doesn't leave a bunch of lines or require a ton of work to make it look good.

I will admit that using photoshop too much can be thought of as turning a photo into art. The same can be said about using polarizers and colored filters - techniques used by photographers for decades. The same can be said about techniques old-timers used in the darkroom such as dodging and burning to give mist around moving water or even (gasp) trying to save a photo like the one I started with.

In this case, I didn't add or delete a single element of the photo. I was simply VERY selective about which components I darkened (which is what a "Multiply" layer does). I didn't even change the contrast, color or saturation. If someone said that they simply darkened a photo, most people would just shrug their shoulders and say, "So what?"

Decide for yourself what you want to do. There may be a gray line (or even a black line) between what you consider art and photography, but you can always fix that with Photoshop ;-)

Steve Byland is a wildlife photographer living in suburban New Jersey. His photos can be seen at www.stevebyland.com . You can email him at sbbyland@aol.com

Sunday, July 22, 2012

Create Your Own Bird Sanctuary


If you love birds, you’ve probably visited a nature sanctuary near your home and marveled at the wildlife. The feeders at the visitor center are teeming with birds of all kinds. It may be only a 15 minute drive, but it might as well be an entire world away.

Apple trees are the perfect cover for birds year round. They have insects in spring and summer, apples through the fall, and thick masses of branches in the winter

So, what is the difference between YOUR back yard and THIS place? You have a feeder or two and get your share of Cardinals and Chickadees, especially in the winter. Still, your yard pales in comparison to the local nature center. They always seem to have something special.

Don’t you wish that your backyard was more like the nature center? It could be. You may not have 100 acres, a pond, open fields and wooded acres like they do, but there are things that you can learn from them to attract more birds into your own yard. I live less than 30 miles from New York City and sometimes feel like I’m directly in the flight path to the Newark Airport, but my yard is swarming with birds. While writing this article, I took a break to take care of the birds in my yard. It’s going to be over 100 degrees today, and they appreciate a little extra attention. I put out some dried meal worms for the Bluebirds and their newly fledged young. The Hummingbird feeders needed to be cleaned and refilled. The Catbirds and Woodpeckers have emptied the suet feeder again. I wiped the birdbaths clean and filled them with cool water. Some seed in the platform feeder, another handful sprinkled on the ground, a few peanuts for the Squirrels, and I was back inside in less than 10 minutes.  During that time, I encountered about 50 birds and close to 20 species. If I had stayed out an hour, I would have probably had closer to 35 species.

Even if birds that don’t come to your feeders may use butterfly bushes like this Common Yellowthroat. Hummingbirds and butterflies will visit in the summer for nectar and insects

Was my yard always like this? Certainly not. It took years to entice Bluebirds to nest here, but they are now fixtures in my neighborhood. The same is true for Hummingbirds. They can be difficult to attract to nest in my part of the country, but I have them visiting my feeders all summer long like clockwork – about every 10 minutes. How did I do it? More important, how can YOU do it too?

Think of creating a backyard bird sanctuary the same way you would think about planting a beautiful garden. Most new homeowners have had the experience of moving into a house, admiring the neighbor’s beautiful garden, then rushing to the garden center for a few flats of flowers. Once in the ground, most of the flowers died within a few weeks and we moaned “I just don’t have a green thumb.” It’s the same thing with birds. We bought a feeder and bag of seed at the hardware store and set it up. It either attracted nothing and the seed spoiled, or we got only Starlings and House Sparrows. “There just aren’t any good birds in my neighborhood,” we said. Why did the flowers die? Why no flock of pretty songbirds? The answer is pretty much the same. They didn’t get what they needed. Flowers need the right soil, the correct amount of light and the proper amount of water. Needs differ for each type of flower. Birds are no different.

Some feeders are designed to prevent “undesirable” birds such as Starlings like this suet feeder that can only be accessed from below 

Each species of bird has very specific needs. If you give them what they want, they will probably come to your yard. Okay, what do they need? 
  • Safety from predators
  • Food
  • Water
  • A place to nest and raise their young (assuming that they breed in your area)
ALL of these are important. Let’s look at each of them.

Safety From Predators – A bird’s eye view of the world is one filled with danger. Hawks above, cats and other predators below. The best shelters come from trees, bushes, brush piles and tall grass. Of course, predators use the same things for cover, so keep a little open space between sheltered areas so that the birds can use their keen eyesight to keep watch. Plan and manage the habitat – that’s what they do at the nature center.

 Hummingbird feeders need not be fancy. Red feeders with yellow flowers are recognized by most hummingbirds as a good source of food. This feeder is about the size of a roll of quarters and cost less than $5.00

Food – This is something that might take a little research. For optimum success, you need to know what birds are in your area at each time of year, what their favorite foods are, their preferred type of feeder, etc. You need to match the type of feeder and food to the species you want to attract. Cardinals, for instance, prefer platform feeders with black oil sunflower seeds. Hummingbirds want sugar water feeders. Woodpeckers, Catbirds and Titmice love suet. A visit to the local nature center can put you on the right track here. Don’t go crazy at first. Just get a few feeders with the appropriate food at first and work your way up slowly. Remember to place the feeders close to the safe places mentioned above. Make sure they are where you can see them as well so that you enjoy your new friends and remember to feed them. Keep the feeders clean, but you don’t need to fill them to the top until the birds are eating more. Having fresh food is important. Since the species of birds in your area changes with the seasons, so will the types of food you should offer.

 This birdbath is heated for year-round use and can accommodate the whole family

Water – Birds need water year-round. Birdbaths range from expensive heated affairs with cascading waterfalls to something homemade. Try turning over a large flower pot, placing the base on top and filling the base with water. The important thing is that the water be clean and available at all times. Not all birds come to feeders, but almost all come to water.

  Here is part of the same family bathing in a bath made from a large, broken flower pot and its base


Nesting – Some songbird species will nest in birdhouses and some will not. Bluebirds, Swallows, Chickadees and Wrens are among some of the more popular songbirds that use nest boxes. Each prefers a slightly different kind of box that will meet their needs while discouraging other species. You might want to buy birdhouses that target the species you want from a manufacturer such as Duncraft (www.duncraft.com) that has different birdhouses for different species. Other birds will probably nest in the sheltered areas listed earlier.

Birdhouses can be made from plans easily found on the internet and can be customized for different species. This box has a wide hole to let more than one baby Tree Swallow look out at a time.

If you are a photographer, like I am, think about lighting while you make your plans. I have a spot in my yard that gets fantastic light in the afternoon. Guess where I put the Bluebird house. Most of my feeders and birdhouses can be rotated to follow the sun provide different backgrounds. I do most of my photography from a blind that keeps me out of the sun and minimizes disturbance to the birds.

Smaller bird houses are perfect for smaller birds such as Wrens, Chickadees and Titmice

Like a beautiful garden, a backyard bird sanctuary grows and matures over time. Every year, you can make it a little better, a little safer and a little more attractive to you and the birds that will come to call your yard home.

Steve Byland is a wildlife photographer living in suburban New Jersey. His photos can be seen at www.stevebyland.com – many of which were taken in his own backyard. You can email him at sbbyland@aol.com